Popular Products

How To Use A Reusable Applicator?

If you’re considering switching from disposable plastic applicators to a more sustainable option, look no further than Lil-Lets.

We understand your desire to be more eco-friendly and contribute to the planet. If, like us, you're keen on the idea of a reusable applicator but need assistance with loading and positioning, you've come to the right place!

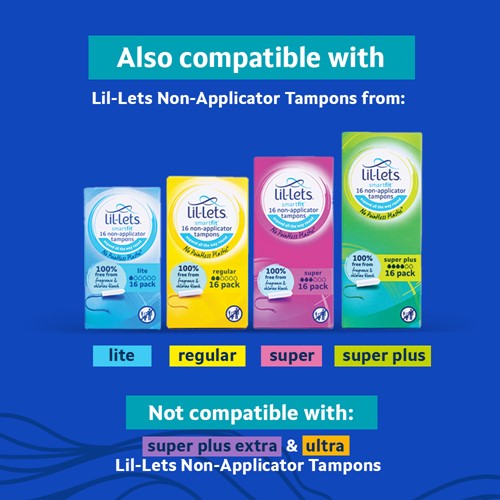
The Lil-Lets reusable applicator is a great alternative to single use applicators and our reusable applicator can be used again and again, it’s made from medical grade materials, free from latex, BPA, and phthalates. It can be used in conjunction with our Lite, Regular, Super and Super Plus absorbencies and because we know life is busy it even comes with its own certified cotton organic bag for convenience and storage.

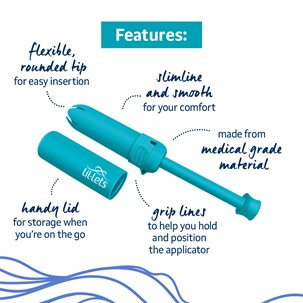
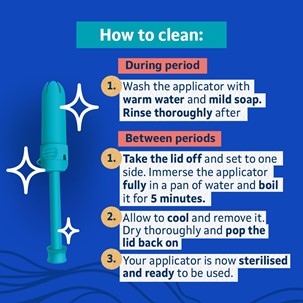
So, let’s get started – familiarise yourself with all of the reusable applicator features, we recommend you sterilise your reusable applicator before using, just the applicator there is no need to sterilise or boil the lid.

FIRST THINGS FIRST –STERILISING YOUR REUSABLE APPLICATOR

  1. Wash your hands.
  2. Wash the applicator with warm water and mild soap, and then rinse thoroughly.
  3. Remove the lid and set to one side.
  4. Immerse the applicator fully in a pan of boiling water and boil it for 5 minutes.
  5. Allow the applicator to cool in the pan and then remove it. Dry it thoroughly before popping the lid back on. Your reusable applicator is now ready for use.

TOP TIP – Don’t let the water boil dry as this could cause the applicator to become mishappen.

LOADING YOUR REUSABLE APPLICATOR

  1. Firstly, wash your hands.
  2. Unwrap the tampon by holding the rounded end and peeling away the gold tear strip.
  3. Remove the bottom section of the wrapper and then pull out the string. Check that the sting is knotted and give it a gentle tug to ensure its securely in place. Now, remove the top section of the wrapper. Great, now your tampon is ready to be inserted in the reusable applicator.
  4. Gently pull the plunger out of the top of the reusable applicator.
  5. Now open it at the hinged section.
  6. Take the unwrapped tampon and pop it in the open top, ensuring the string is coming out of the dedicated string opening.
  7. Close the hinged section until you feel it fully click into place.
  8. Get yourself into a comfortable position, maybe sitting on the toilet or standing with knees bent- squatting and remove the lid.
  9. Insert the applicator into the vagina, aiming towards your lower back.
  10. Carry on inserting until the base of the applicator is touching the entrance to the vagina.
  11. Now push the plunger all the way in.
  12. Remove, and wash the reusable applicator with warm water and mild soap, dry thoroughly and place the lid back on, now pop into its organic cotton bag and you’re done!

TOP TIP – Keep the string secure with your thumb, pressing it firmly against the lid until ready to insert.

REMOVING YOUR TAMPON

If you’re new to tampons, here our tips for removal. Tampons can be worn for between 4-8 hours and when you’re ready to remove your tampon, relax and gently pull on the string and the tampon will glide out very easily. Wrap the tampon in toilet tissue and dispose of with normal household waste. If the tampon feels tightly held, don’t worry, it simply means it’s not yet absorbed enough menstrual fluid and you can leave it in a little longer (never longer than 8 hours though).  If the tampon still feels tightly held after this time, remove it and consider using a lower absorbency for the lighter days of your period.

At the end of your period, you’ll need to resterilise your applicator, just like you did in the beginning, dry it thoroughly and then pop in your cotton storage bag, in a cool and damp free place until your next period.  You see not so difficult after all!

LIL-LETS GOLDEN RULES FOR WHEN USING A REUSABLE APPLICATOR

  • If you’re out and about, and don’t feel comfortable cleaning your applicator in public toilets, take bottled water with you and give the applicator a rinse with this. Then when your home, give it a clean with warm water and mild soap.
  • We know us girls love to share with friends, but please don’t be tempted to share your reusable applicator with anyone else, even if it’s your bestie.
  • Inside every Lil-Lets reusable applicator box you will find full instructions for taking care of your applicator and if you follow these guidelines your applicator will last for many years, but do check it regularly for any damage, or wear and tear, and don’t worry a bit of staining may look unsightly but it’s perfectly normal.
  • If your applicator becomes sticky or splits, we do advice throwing it away and replacing. Wrapping it up and popping in your normal household waste is the best method for disposal.

Want to try the Lil-lets Reusable Applicator?

FAQs

Can I only use organic tampons with my reusable applicator?

Any non-applicator tampons from the Lil-Lets range will be suitable for use with our reusable applicator. Remember that the applicator will accommodate our Lite, Regular, Super and Super Plus absorbencies!

Why don’t I need to sterilise the lid of my reusable applicator?

Because the lid of your applicator does not come into contact with your vaginal opening there is no need to sterilise. It is also made from a softer material to the main body of the applicator and as such sterilisation of the lid could lead to it becoming misshapen.

I can feel the tampon inside, me what am I doing wrong?

Like anything new, using a reusable applicator can take practice and we’re convinced that after a few attempts you’ll be an expert at getting your tampon into the most comfortable position. If this is still an issue, we suggest pushing the applicator in a little farther so the only part sitting outside the vagina is the plunger section. And remember aiming the applicator in a slanting position towards the lower back is the best technique for insertion.

Stay up to date

Want to keep in touch with Lil-Lets? Sign up to receive our newsletter to be the first to receive brand updates, articles & much more.